

Detailed instructions on how to install Elxis CMS, IOS Reservations and IOS Rentals
To use IOS Rentals booking engine for cars and motorcycles you will need, if not already installed, Elxis CMS, IOS Reservations component, and of course, IOS Rentals extension. Elxis CMS is free/open source software which you can download from elxis.org. IOS Reservations and IOS Rentals are commercial extensions provided by Is Open Source. It is very important to know that we can perform all the installations and initial configuration described below for free for our customers. So, if you don't want to mess with the installation just tell us so and we will install everything for you for free. In this case you don't need to read this guide any further.
Elxis installation
If you already have Elxis installed skip this step. Visit elxis.org and download Elxis. If you have already a site built with Wordpress, or other software, you need Elxis just for IOS Rentals and you wont build a public site with Elxis, then we advise you to install Elxis in a sub-domain (for example rentals.example.com). In this case create the sub-domain first. You do so from your web hosting control panel (plesk, cpanel, etc). From the same panel create a database for Elxis and a user for the database. Also create an SMTP email account. This email account is highly recommended inorder for Elxis and IOS Rentals to properly send notifications for new reservations, contact requests, etc. Note down all the usernames and passwords, you will needed them later.
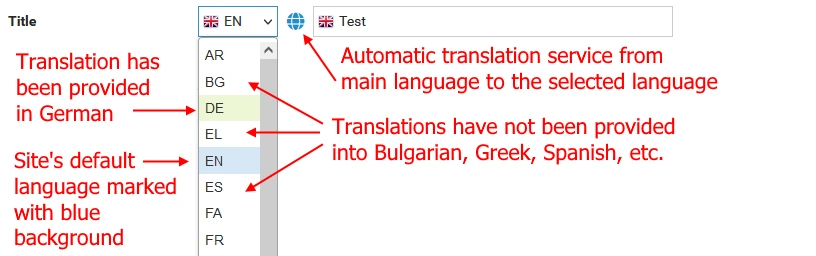
Upload the Elxis zip package at your site and unzip it. The folder you upload it is advised to be empty or almost empty. If there are index files delete them (index.html, index.php, ...). Unzip Elxis package. Open your web browser and visit the URL of the site, for example: https://rentals.example.com . Elxis web installer will be displayed. Follow the installer to complete the installation. Many options provided here, like site name, can be changed later after Elxis installation from Elxis administration panel. What is very important is the proper selection of the site's main language and the rest public languages. You can publish just 1 language, all, or any number between them. Elxis is translated in more than 20 languages. The content (articles, descriptions, etc) is added in the main language and you can optionally provide translations to other languages. But the content in main language is required. If, for example, the main language is Greek and your site has also German, English and Italian as public languages then when you switch language to German you will see the title in Greek. This will be bad for your German audience. So, peek wisely the site's main language. For international and tourism related web sites, or for sites with more than 2 languages we advise you to pick as main language English. During the installation process you create an administrator user. Note down that username and password. Don't forget to also enable SEO friendly URLs with Apache htaccess. Finally pay attention that the URL of the Elxis administration console is not fixed but been generated with a random name by the Elxis installer. So, each Elxis site has a different URL for the administration console. After the installation is finish visit the site and note down the administration console URL. It will be something like https://rentals.example.com/andromeda6/
Elxis configuration
Login in Elxis administration panel. Go to menus manager and unpublish the links to the administration console in both main manu and top menu. Go to Elxis configuration (Site > Settings) and check all the settings carefully. Make sure SMTP emails are working properly by using the Send test email feature. If you connect IOS Rentals with a Wordpress site then you might need to disable Elxis Defender. This is because a Wordpress site receives many web attacks which via the API connection might try to reach the Elxis site. In this case Elxis Defender will ban the Wordpress site and the IOS Rentlas API connection will stop working. In this case disable the Defender, Elxis is extremely secure with or without the Defender.
Do the following only if you use Elxis only as backend platform for IOS Reservations. We will do this to hide Elxis default content and public pages. From the side menu select Extensions > Browse EDC. Click the search icon, type Empty and hit enter. Install template Empty. Go to template's Empty parameters and configure them as you wish. Go back to Elxis general configuration and on the first tab labeled General set Style and layout > Site template to Empty. Visit the frontend of the site. You will see nothing else than a screen with your company name/logo and copyright.
IOS Reservations installation
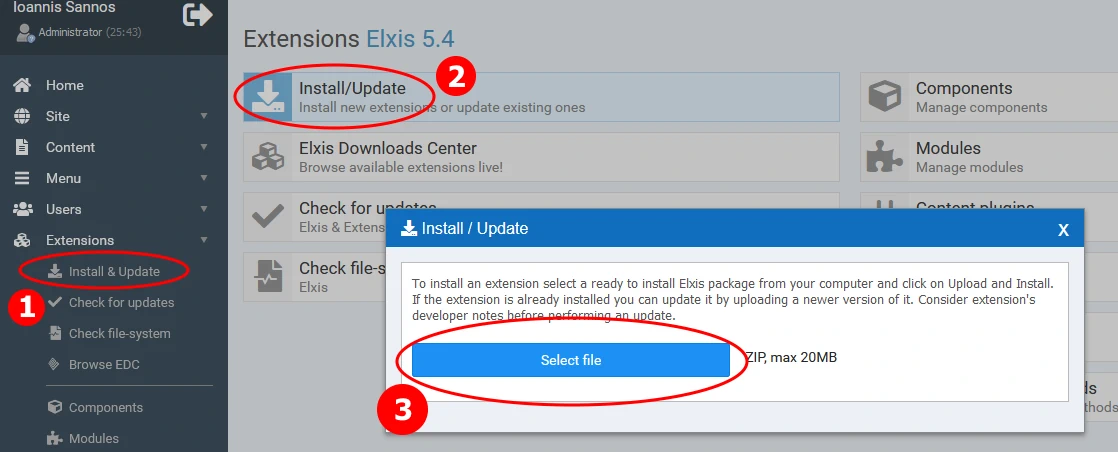
If you already have IOS Reservations installed skip this step. Unzip locally at your PC the IOS Reservations package you downloaded from isopensource.com. You will see a zip file named com_reservations_X.X_rXXXX.zip. This is the component IOS Reservations. In Elxis administration go to Extensions > Install and update. Select the IOS Reservations component and install it. After installation edit component's parameters.
IOS Rentals installation
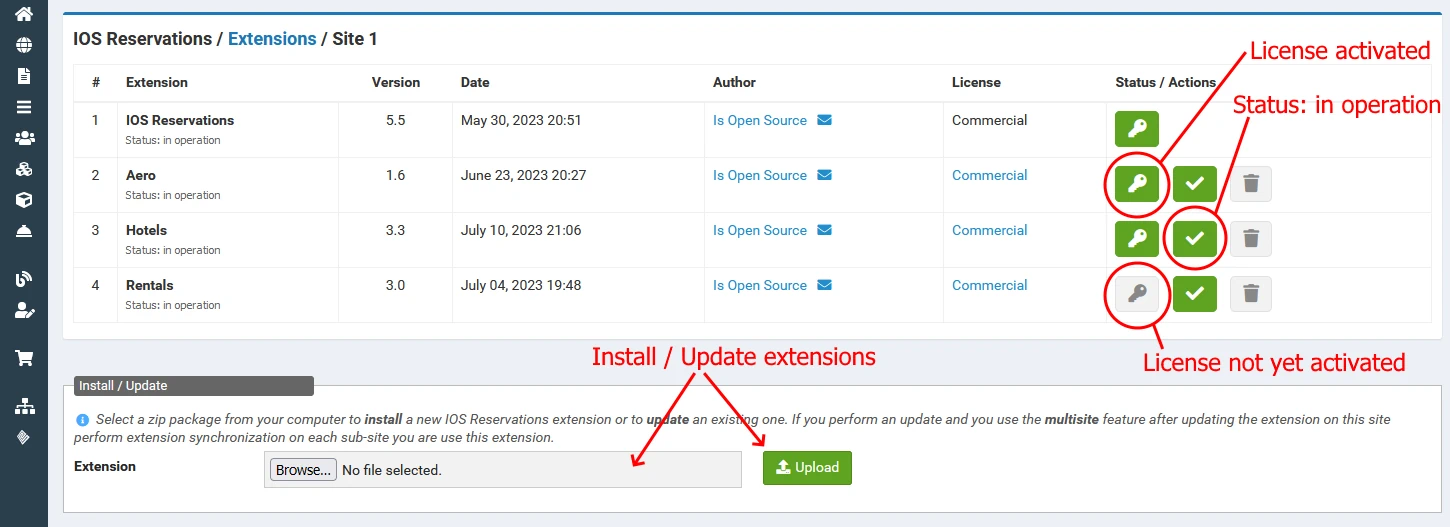
Unzip locally in your PC the IOS Rentals package you downloaded from isopensource.com. There is a zip file named ext_iosr_rentals_X.X_rXXXX.zip. This is the extension IOS Rentals. Go to Elxis administration console and select IOS Reservations > Extensions. You will see a form at the bottom of the page to upload and install IOS Reservations extensions. Select the IOS Rentals extension zip and install it. After installation IOS Rentals will be displayed in extensions list as Stopped, meaning disabled. Click the button with the check symbol to turn it's status to In operation (refresh the page if nothing changed). From Elxis menu select IOS Reservations > Control panel. You will see 2 vertical menus, one for IOS Reservations and one for IOS Rentals. If you have more IOS extensions installed you will see more menus. Click on Settings in IOS Rentals menu. Set application title, enable logs, set logs rotation to something between 30 and 60 days, and finally set Remote bookings to Yes. This final setting enables the IOS Rentals remote XML/JSON API system.
Software activation
After buying IOS Reservations and IOS Rentals you receive an e-mail with 2 activation keys, one for each package. These are required in order to release the full power of the software. Go to IOS Reservations > Extensions. On the actions column for IOS Reservations click on the gray button with the key icon. Provide the Activation key for IOS Reservations and click Activate. Do the same for IOS Rentals and this time provide the activation key for IOS Rentals. Τhe software is activated. The key icons have been turned into green. If not, refresh the page. Note that you can activate the software ONLY ONCE. After activation the license locks in the current site's URL and cannot be used in an other site/URL even in the same domain. So, make sure you are going to use the software under that specific URL address before activation.
Start using the software
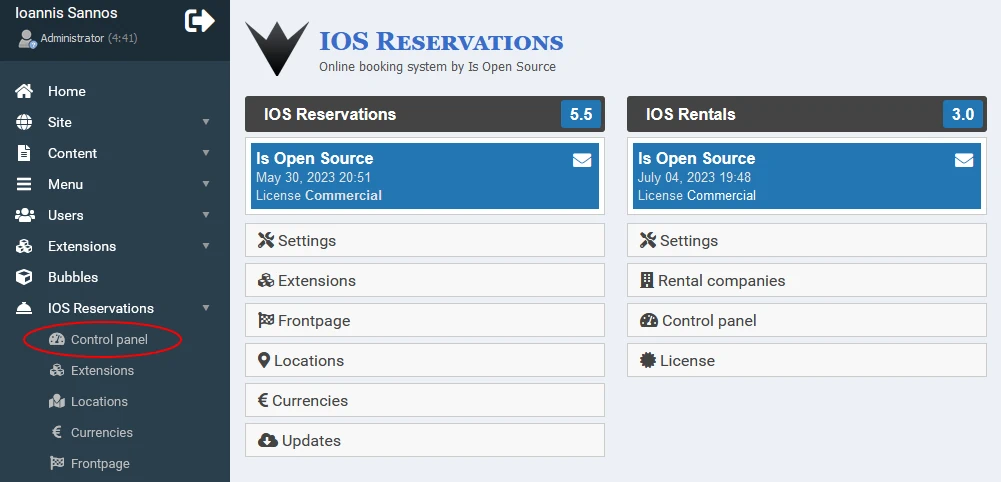
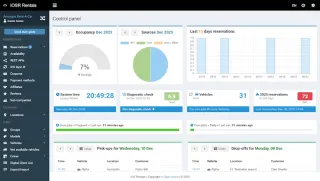
The first thing you must do is to add a rental company. Go to IOS Reservations > Control panel and then on IOS Rentals menu click on Rental companies. Click the Add button. Provide the details of the rental company and save it. These are the very basic settings of the company. Much more options are available in IOS Rentals control panel. Make sure the company is active. Now you can go to IOS Rentals control panel to start adding your vehicles, pick-up locations, etc. You will find a direct link to that panel in IOS Reservations > Control panel page and then in IOS Rentals vertical menu (Control panel). You can also visit IOS Rentals control panel by typing directly its URL in a browser window.
Related articles

IOS Rentals 4.0 - Editions, Smart Coupon Automation and Faster Vehicle Search
IOS Rentals 3.8 - The upgrade that drives your business forward

Manage rent a car vehicle damages
Need help?
If you need further assistane, contact us, use the Elxis forum, or purchase our professional support service for Elxis sites.
Read also
- IOS Rentals 4.0 - Editions, Smart Coupon Automation and Faster Vehicle Search
- IOS Rentals 3.8 - The upgrade that drives your business forward
- Manage rent a car vehicle damages
- IOS Rentals 3.6
- Affiliate bookings for car rental companies

- The cart is empty
Projects
Projects completed
Open Shop 4.5
Added payment method Nexi XPay. Payment notification emails are now HTML formatted.July 04, 2026IOS Rentals v4.1
Payment method Nexi XPay (Alpha bank), synchronize prices, improvementsApril 18, 2026IOS Hotels v3.6
Charge per person, unique features, HTML emails, new payment methodsMarch 29, 2026IOS Rentals v4.0
Automatic coupon generation, software editionsFebruary 11, 2026IOS Reservations 6.0
Various improvements. Required for IOS Rentals 4.0+February 05, 2026IOS Rentals v3.8
Paypal checkout, diagnostic check and moreNovember 29, 2025Open Shop 4.0, 4.1, 4.2
Removal of inline events, Paypal Checkout, dialog messages, myPOSNovember 19, 2025IOS Rentals v3.7
Vehicle damages management, Digital client List support for AADE (Greek companies)June 28, 2025IOS Rentals v3.6
Export/import data, booking options, global overview and NBG.April 16, 2025IOS Hotels 3.5
Reviews, affiliates, IOS Sync, Global overviewMarch 29, 2025
